Ever see a beautiful poll on Facebook and think something similar would be perfect for your website or business? Think it would be too hard to create it yourself, or too expensive?
Follow these step-by-step instructions, and you can create a great looking poll that will get engagement. You can even copy it for a later poll campaign, and customize where needed.
Key Takeaways on Creating a Poll for Your Facebook Page
- Creating a custom poll is easy to do.
- Woobox polls can easily be embedded in websites, emails, Facebook tabs, and shared on social media – including your Facebook timeline.
- Instead of “embedding” a poll on a Facebook timeline, Woobox users can share a unique URL to your fully customized poll. That means you can use it across other social media platforms, blogs, and websites.
- Following the steps below, anyone can craft a poll that looks as if it were made by a big-time marketing agency!
How To Create A Poll
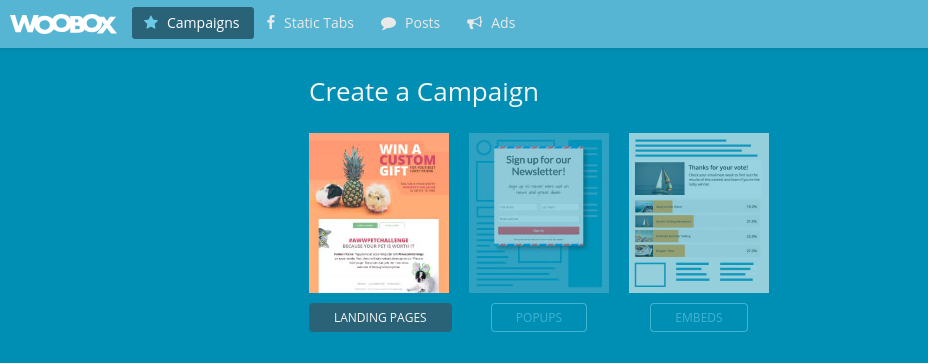
After you sign up for a free Woobox account, click the Landing Pages option from the Campaigns screen and select either a Gallery style or Button style Poll.

Then follow these steps.
- Title your campaign and click Set Me Up

- Fill out the boxes on the Edit screen (Title, Description, Entry and End Dates)

- Choose how you want users to enter (Email address, Facebook, Twitter) and if you wish to limit to one entry per day.

- Click Save at the bottom of the page
Customize Your Poll
Now the fun part begins! Click on the Customize tab, and add your choices. You can use text, video, images, or HTML to highlight your audience’s options. You can also use tons of custom tools to make the poll look exactly the way you want.

When you’re done hit Apply and Save.
Even More Customization
You can further customize in a variety of ways, including adding additional content, images, videos, forms, social share buttons, and more!
Add Elements
You can add additional content by clicking on the +Elements icon. This gives you many items you can add and customize:
- Text
Add a text section, or writing with a custom or pre-loaded background, or upload your own.

- Canvas
Here you will find shapes, icons, backgrounds, and header texts. If you don’t see what you like, you can upload your own images to use.

- Image
- Add another image and place it where you want on the page.
- Divider
- Add a divider to highlight or offset sections.
- Content
- Under content, you can add a “mini-article” adding a Title, Body, and Image

- Video
- Add Videos on Facebook, Vimeo, YouTube, Instagram, and other sites using .mp4. Enter your URL and select whether you want the clip to Autoplay.
- Form
- You can create custom forms with fill-in boxes, check boxes, social media likes and follows, radio buttons, and drop down menus or a request to enter an email.

- Social Share Buttons
- Make it easier for visitors to share with a one-button click to Facebook or Messenger, Twitter, Pinterest, Google+, or by Email.
- Custom HTML
- Advanced users can add custom HTML
You can arrange content by simply dragging and dropping elements on the screen. If you’re looking to add more information about your business, like your location, hours, and a map, just click on Content and add them in. Maybe you want to add a coupon or discount offer when people take the poll, add it to Text, or upload the coupon under Images.
Add Backgrounds
Choose from a transparent background, search for one of the many pre-loaded backgrounds, or upload your own to give your poll an even more polished look.

Add Styles
Under Styles, you can select global settings for a default font as well as font and link colors.

After you’ve got things in place, it’s not too late to change anything! You can click on the item and change the information or image by adjusting the elements in the customize menu that pops up. You can also change the location of anything on the page by clicking on it, dragging and dropping it where you want it to display.
Finalize Your Poll
When you’re happy with the way it looks, make sure to hit Apply and Save. Click Exit, and it will take you back to the Overview page. To take it Live, click the Upgrade button in the upper-right corner.
Creating an account and building your poll is free. A subscription to Woobox is required to publish and run a marketing campaign.
You can find more details on how to create and customize a poll here.
Use Your Poll
Sharing and embedding your poll is easy! Under the Publish category, you can get the code to embed it on your website or create a tab on your Facebook page. With just a few clicks, you will have your poll up and running on your site or added to your Facebook page.
Promote Your Poll on Social Media
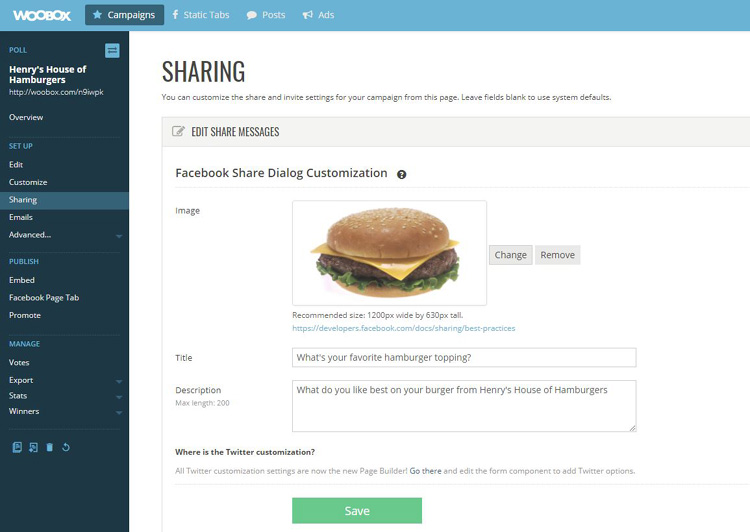
Your Woobox poll can easily be shared on Facebook with enhanced features. Click on the Sharing category, and it will open up the Facebook Share Dialog. From there, you can customize Images, Titles, and Descriptions by just filling out the box. Hit Save when you are done.

NOTE: If you want to share your poll on Twitter, you can add Twitter sharing options from the Page Builder by selecting the Share Element and clicking “Settings”. There’s also a link to the Builder right on the Facebook Share Dialog Customization page.
Head to the Promote category on the menu. Here’s where things get really good. Not only can you customize the message even further, but you can do audience targeting right from Woobox!
- Post Message: This is the text input area above the link/image of the campaign in the preview below. Fill this in with any extra information about the campaign or why you’re sharing.
- Audience Targeting: These options will target your shared post to the News Feed of fans corresponding to the specified parameters. Target by Age, Gender, and Country.

That’s all there is to it. Hit share and the post will go live on your Facebook timeline! For broader reach, you can boost your post on Facebook and further customize your target audience.

On-Line Or Phone Support
If you run into any trouble or have questions about creating, customizing, or sharing a poll you can reach out via email to support@woobox.com or by calling our support team at 360-450-5200 between 8am and 5pm PST Monday through Friday.
