When there’s a basketball tournament or any other sports event your audience is excited about, don’t miss the opportunity for greater reach and engagement. Support their spirit to go head-to-head against competitors the way their favorite sports teams do.
Predictive brackets from Woobox make it easier than ever to capture your audience’s interest and turn it into engagement with your business. Your audience can come to your platform to bet on the winning team for each match in a tournament while getting their own chance to win a reward from you.
In this article, we’ll look step-by-step at how you can set up Woobox predictive brackets for sports events and how to operate them.
Your Initial Setup
To create a predictive bracket, start by signing up with Woobox and linking your business’s Facebook fan page. You’ll then be taken to the Campaigns page of your Woobox dashboard. To set up your bracket, choose whether you want it to be on a Woobox hosted landing page or embedded on an existing web page on your website.
Next, give your campaign a name, which will show up as the title of your bracket’s web page. Select “Predictive” as the type of bracket. Finally, select from the drop-down menu the number of teams playing in the tournament. This determines how many matches there will be, and it goes up to as many as 64. Finally, click “Set Me Up” to generate your template.
Naming and Correlating Regions
Now that your template is generated, you’ll see a link in the top left corner of your dashboard you can click to view your bracket. Of course, it will be empty until you’ve filled out the settings. On your dashboard, you should be prompted to enter region titles for your bracket. Or, click “Bracket Settings” on the left-hand navigation bar.
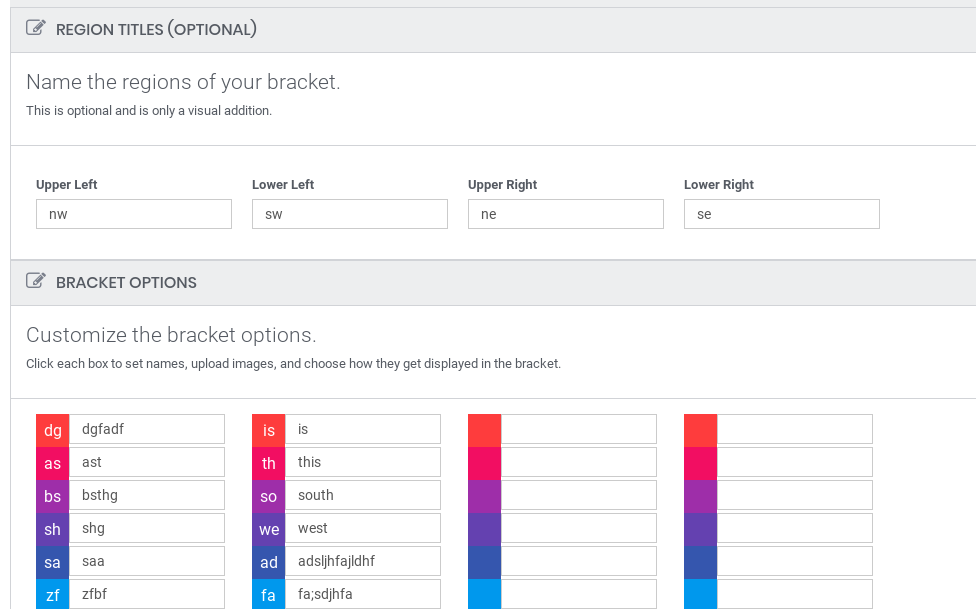
Naming the regions is an important step because it ensures teams are placed in the correct slots of the bracket. In the first section of the settings page, you can enter region titles, which are reference names only for you to see on the back-end. Beneath that, you’ll see color-coded fields. This is where you set up the options your participants choose from during each match. Click on the text field to write the name of the option, and click on its colored box to upload a picture that represents it. Adding an image is optional, but it helps to give your audience a visual of what they’re picking when they look at the bracket.
How to Advance Winning Teams as Matches Progress
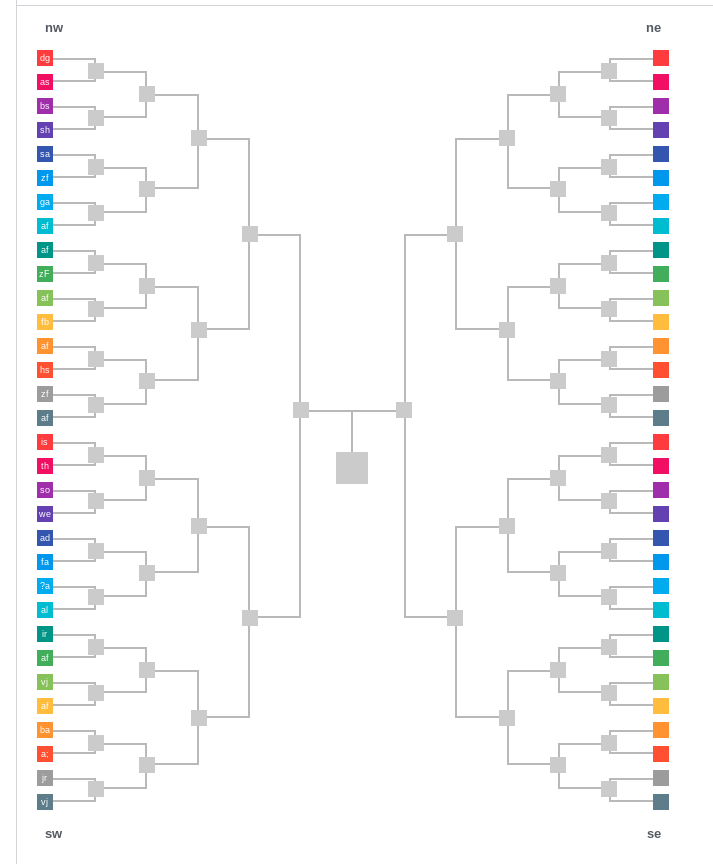
As a tournament progresses, you’ll need to advance winning teams in the Bracket Results section of the Bracket Settings page. To move a team forward in the bracket after they win a match, click on the box that corresponds to it. To undo, click it again while holding down the Shift key. Click “Save” for the changes to take effect. On the left-hand navigation bar, click on Leaderboard to toggle whether you want the leaderboard to show to your users. If you enable the option by checking the Show Leaderboard box, they’ll be able to see their score.
Setting Up Registration for Your Bracket
Once you're done setting up the competing teams in your bracket, you can navigate to Edit using the left navigation bar. Here you can edit the title and brief description for your bracket. You can also set precise start and end dates and times for registration and participation.
You're able to set requirements and restrictions for users allowed to participate in the bracket. For example, you can create an “age-gate” that restricts users under a certain age. On this page, you can also choose whether the bracket results will display once the campaign is over.
The Form Fields page on the left-hand navigation bar is where you can edit the registration form users must fill out to enter into your bracket. You can add form fields to your registration form to collect as much data as you desire from participants. Analyzing demographic data from your participants can help you target and generate leads in other areas of your marketing plan or for future brackets.
Under the option “change form location,” you can set the location of your bracket entry form to be at the bottom, top or at a specific position within of the web page. You can also customize the background and border around the entry form. At the bottom of the Forms Field page, you have the option for data collected through the registration form to be encrypted under SSL in order to assure your participants that their information is safe on your website.
Editing Your Bracket’s Display
Navigate to the Customize page to tailor the look and feel of your campaign’s pages to match your unique branding. You can edit the entry page, post-entry page, ended page, pre-start page, and official rules page. If you want to keep it low-tech, you can use Woobox’s default templates, and simply upload your own images into the templates, such as a logo or other graphic that adds to your branding and engages your audience.
If you have a web designer or have some coding skills of your own, you can code your own unique pages for full control over the design.
At the bottom of the Customize page, you have the option to password-protect your campaign.
Once you’re happy with your campaign and are ready for it to go live, navigate to the Overview page or the Edit page and toggle the Admin-Only setting to turn off Admin-Only mode. Your campaign is now live!
Garnering Participation
Woobox provides several opportunities you can take advantage of to help you promote your bracket and garner more participation from your audience.
You can integrate your campaign into your Facebook page, where it will appear as its own tab. This way, your Facebook fans can enter the bracket without leaving Facebook.
Woobox also has several sharing features that let you share your bracket entry page through social media networks, email marketing platforms like MailChimp and Constant Contact, Facebook ads and more.
You can also take advantage of tools to track your engagement metrics, which you can analyze within Woobox or by linking Woobox with Google Analytics or other tools. Woobox is compatible with over 500 tools using the Zapier integration. Tracking the performance of your brackets can help you optimize future ones and fine-tune your marketing strategy.
TL;DR
- Start by signing up with Woobox at https://woobox.com/signup
- From the Campaigns screen, choose "Landing Pages" -> "Bracket"
- Select “Predictive” and set the number of competing teams for the tournament
- Under “Bracket Settings”, name the competing teams
- As you go, advance the winning teams by clicking on them in the bracket diagram on the “Bracket Settings” page
- On the “Edit” page, set requirements and barriers to entry in your bracket, and create the form fields users need to fill out in order to enter
- Customize the look of your campaign’s various pages using the default template Woobox provides or providing your own coding
- Integrate your campaign into your Facebook fan page and utilize sharing tools Woobox provides to help you share your bracket to various social networks and in your email marketing campaigns
- Track campaign metrics to measure your performance
Looking for Support?
The Woobox Support staff are glad to answer any questions you may have. Reach out by phone from 8 am to 5 pm PST, Monday through Friday. Call 1-360-450-5200. Or, send an email anytime to woobox@support.com.


Build a campaign in seconds
Describe a giveaway, quiz, poll, survey, or coupon and Woobox launches a hosted, mobile-ready page in seconds. Free to start, no credit card.
Try Woobox free