
Your fans are thinking of brackets this time of year. What better way to capitalize on the hype than by running your very own bracket competition? The Bracket app allows you to pit choices against each other, and have users predict the matchups. The result is a fun way to engage users and increase their awareness of your brand.
1) Basic Settings
To get started, click the Bracket tile from the Promotions page in your Woobox dashboard. If you’ve run a Woobox promotion in the past, just click on the big green button in the top right corner, and select Bracket from the dropdown menu.

The next thing you’ll see is the main setup page, where you’ll input your offer’s Title, Description, and Restrictions (if you have any). After that, you can choose to display an Optional Like-gate, decide when the offer starts and ends, and choose any entry restrictions for the bracket.
This is where you will also enable your Bracket Leaderboard where users can see where they stand with their predictions relative to other entrants. When you click the big green button at the bottom of the screen, you’ll be automatically redirected to the next step: creating your Bracket.
2) Creating Your Bracket
In the Bracket Settings section simply select how many options you’d like for your bracket, and click Create.
Next you will name the options in your bracket. The options are divided into four columns at the top of the page. Each column will be placed into a different section of the bracket – Upper Left, Lower Left, Upper Right, and Lower Right respectively. You can also upload an image for each option. The maximum image size is 300px by 300px.
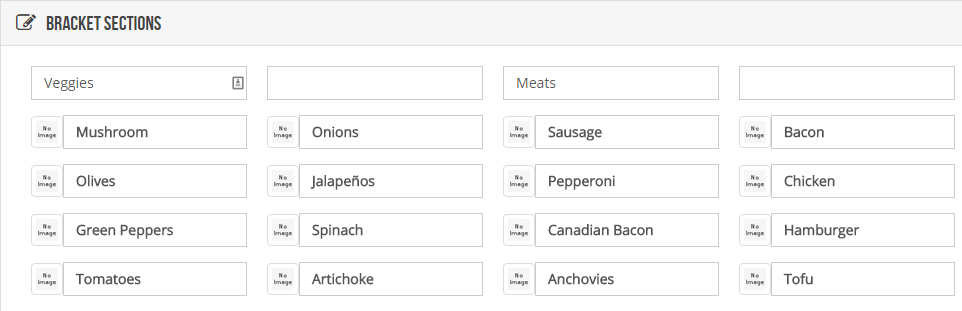
Above the columns are optional Region Titles. These are purely visual, and will be displayed in the Upper Left, Lower Left, Upper Right, and Lower Right corner of the bracket.
3) Customizing Your Bracket
Almost there! By this point, the groundwork for your Bracket has been laid. Now you can customize the look and feel of the promotion.
Under the Customize page of your dashboard, you can add an image to the Entry page and/or Leaderboard/Ended page. This image will act as a header for the layout.
If you want to collect additional information from users before they can submit their predictions, just head to Form Fields and you can add some extra inputs.
None of these things are required, but they will let you customize the look and feel of your Bracket to match your brand.
4) Publishing Your Bracket
All Woobox promotions can be embedded into a web site or WordPress blog, just by copying and pasting a couple lines of code from the Embed section of your dashboard. This blog post has some more detailed instructions.
You can also choose to install it as a Facebook tab via the Facebook Page Tab section.
5) Promoting Your Bracket
As with all Woobox offers and apps, when you promote the Bracket, you’ll always want to make sure you’re using the shareable offer URL (http://woobox.com/xxxxxx). This URL is mobile-friendly and will automatically detect mobile users and redirect them to the mobile version of the offer; while non-mobile users will be taken to the appropriate version for them (e.g., your Facebook Page Tab).
After the bracket has gone live, simply allow users time to enter their predictions. You can export all user data via the Exports > Download menu option.
6) Choosing the Results
After the entry period has ended, you can choose the results for your bracket. This is all done via the same Bracket Settings page where you configured the options.
To move an option forward in the bracket, simply left click on it in the Bracket Results section. To undo a choice, hold down the Shift key and left click on the option.
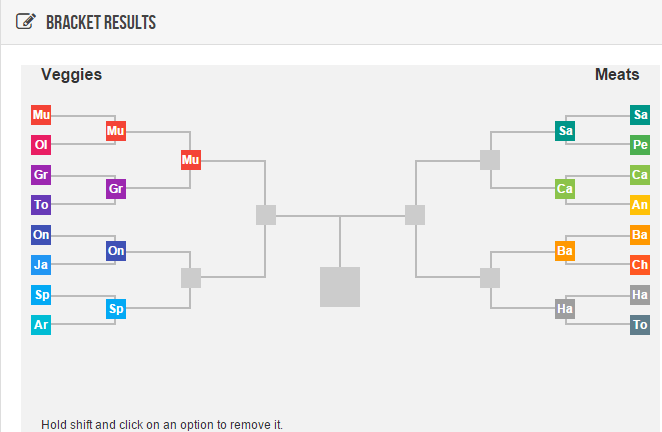
Once you’ve put in the appropriate results, click Save at the top of the screen, and our system will tally up the results. You can view the scoring from the Leaders section of your dashboard, and if you enable the Show Bracket Leaderboard option from the Edit page, your users will be able to go back to the app and find their score!
7) Scoring
Scoring is dependent upon the number of rounds and bracket options that you will have in your contest. Each round 1 will award 10 points for each correct option selected in the bracket. The points will double each round as the number of bracket options is cut in half. This means that each round will be worth the same amount of overall points and gives the later selections a bit more weight for getting them correct. For example, if we have a contest with 16 total bracket options, the score would be 80 possible points for the first 8 matches, then round two would also be worth 80 points because the 4 remaining matches of 8 options would be worth now 20 points for the correct selection. This pattern continues until the final round of your bracket promotion.